Firebase basics and events
— javascript, web-development, firebase — 5 min read
In the beginning 2017 or 2018, when i first started to learn and use firebase. My perspective on certain things changed. Usually, when i get an idea or concept, i start to write the structure of the table and how the data is going to be stored and in parallel, i draw a simple sketch of the application and write out what data its going to access from which table. For me, it sort given an idea of the flow.
Firebase sort of takes this to the next level and makes you say, Dont start with the data structure design at all. First design the UI and work on the User Journey and then based on the user journey build the structure of data.
Relational database users or DBA may think in a way Responsibility of the database is to store the data in the most effective way – it shouldn’t be affected by how the UX will work.
But when using firebase type of database, thinking like relational database designer will affect the performance of the application as firebase doesn't have any SQL or JOINS. So, designing the application should start from UI to Backend not the other way around.
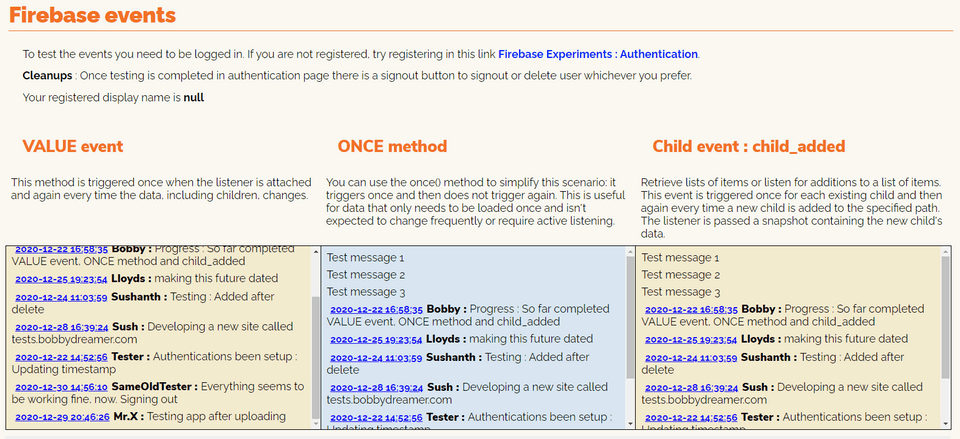
Here i am building a simple application to illustrate various firebase events in a simple HTML page.
Working example is available here in Firebase Experiments : Firebase Events. To test it out, first you will have to register here. Once you finish testing, you can delete the user yourself, option is available in the page. I would be really grateful, if you do that.
Firebase also known as Realtime Database as it can synchronize data across multiple devices and data is stored in Cloud(since its acquired by Google, data is stored in Google Cloud). Firebase has multiple products,
- Firebase Realtime database, this is their first product
- Firebase Authentication
- Firebase Hosting
- Firestore
- and there are many more like Crashlytics...
Interesting thing about firebase is, its a database but you don't need any drivers or anything else installed in your machine to connect to it or use it. Here are we are building a simple HTML Application, so we will be using SDKs from CDN.
Main firebase products & features, i will be using is,
- Firebase Authentication
- Firebase Realtime Database
# Setting up firebase app
Go to
firebase console -> Project Overview -> Project settingsIn General tab, in "Your apps" click WEB
</>icon .
Copy the Firebase SDK snippet. If you don't copy no problem, same script is available in this page
firebase console -> Project Overview -> Project settings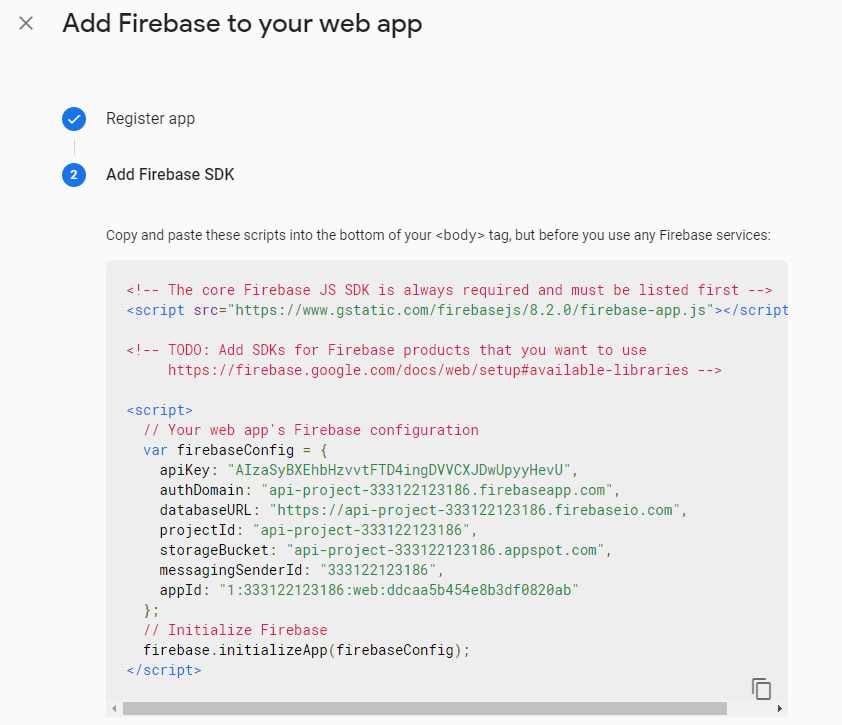
Add the following scripts to the bottom of your
<body>tag. Highlighted are the services, we will be using this example app.1<body>2 ...3 <!-- Insert these scripts at the bottom of the HTML, but before you use any Firebase services -->45 <!-- Firebase App (the core Firebase SDK) is always required and must be listed first -->6 <script src="https://www.gstatic.com/firebasejs/8.1.2/firebase-app.js"></script>78 <!-- TODO: Add SDKs for Firebase products that you want to use9 https://firebase.google.com/docs/web/setup#available-libraries -->10 <!-- Add Firebase products that you want to use -->11 <script src="https://www.gstatic.com/firebasejs/8.1.2/firebase-auth.js"></script>12 <script src="https://www.gstatic.com/firebasejs/8.1.2/firebase-database.js"></script>13</body>Since its development, you can set the firebase rules like below and default is
falsemeaning deny all users by setting as below you are allowing all users. Since this is test, you are the only user. So its fine. Rules are inFirebase Console --> click left side Realtime Database --> on the right side click Rules tab
1{2 "rules": {3 ".read": true,4 ".write": true5 }6}Now firebase is setup and ready for coding.
# Building the sample application
This sample application is sort of like a chat application consists of two main things.
- Authentication
- Firebase Operations
Without authentication, it could work but that would make everything public. So having authentication, gives you a little control on things.
# Authentication
One of the best things about Firebase is you don't have to build your authentication system, its readily available(Backend & UI for federated). Firebase supports federated identity providers like Google, Facebook, Twitter, Apple, GitHub, Microsoft and Yahoo. Other authentication types available are email link(email verified), email password(email unverified), Anonymous and Phone number.
Working example : Firebase Experiments : Authentication
For Authentication system to work, it needs to be executed in a local server, if its execute from a .html file, you will get below error message.
1code: "auth/operation-not-supported-in-this-environment"2message: "This operation is not supported in the environment this application is running on. 3"location.protocol" must be http, https or chrome-extension and web storage must be enabled."4
5# Solution 6Authentication wont work, when file is directly opened in browser as a `.html` file. 7File needs to be loaded via web server as authentication services will use Web Storage. 8At the minimum nodejs expressjs should resolve the problem.Here, i have setup three types of authentication examples,
Google Authentication : Once you click the SignIn with Google button(btnSIG), below code will get triggered. This can handle registration and login.
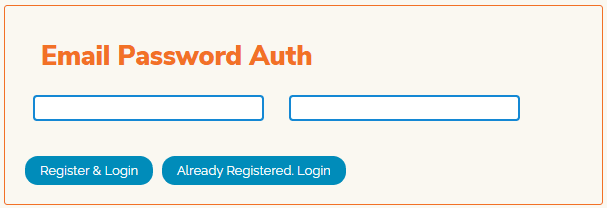
1/* Google Authentication2––––––––––––––––––––––––––––––––––––––––––––––––––------------------------------------ */3btnSIG.addEventListener("click", e =>{4 const provider = new firebase.auth.GoogleAuthProvider();5 provider.setCustomParameters({6 prompt: 'select_account'7 }); 8 firebase.auth().signInWithPopup(provider); 9});Email Password Authentication : In this example, i have written two separate functions, one for Registration and other for login.
1/* Email Password Register2––––––––––––––––––––––––––––––––––––––––––––––––––------------------------------------ */3btnRaL.addEventListener("click", e =>{4const auth = firebase.auth();5const promise = auth.createUserWithEmailAndPassword(txtEmail.value, txtPassword.value);6promise.catch(e => {7 if(e.code == 'auth/email-already-in-use'){8 txtMessage.innerHTML = 'Hello, '+e.message;9 }else if(e.code == 'auth/weak-password'){10 txtMessage.innerHTML = e.message;11 }else12 txtMessage.innerHTML = e.code, ' ',e.message;13});14 promise.then(e => console.log(e.user, ' ', e.email));15});16
17
18/* Email Password Login19––––––––––––––––––––––––––––––––––––––––––––––––––------------------------------------ */20btnARL.addEventListener("click", e =>{21 22 if(txtEmail.value.length == 0 || txtPassword.value.length == 0){23 return console.log('email & password required');24 }25
26 const auth = firebase.auth();27 const promise = auth.signInWithEmailAndPassword(txtEmail.value, txtPassword.value);28 promise.then( firebaseUser => {29 // console.log('Trying to go to success.html');30 });31 promise.catch(e => {32 console.log(e.code, ' ',e.message)33 if(e.code == 'auth/user-not-found'){ 34 txtMessage.innerHTML = 'Register first to login';35 }36 });37});Anonymous Authentication : This just creates user, thats it. Best one for users who don't like giving out their email IDs and later worrying about spams and follow-up mails. On the downside, there could be a lot of Anonymous registrations. Automated cleanup might be required that would endup as a Cloud function probably thinking about it.
1/* Anonymous Authentication2––––––––––––––––––––––––––––––––––––––––––––––––––------------------------------------ */3btnAnon.addEventListener("click", e =>{4 5 const auth = firebase.auth();6 const promise = auth.signInAnonymously();7 promise.then( firebaseUser => {8 // console.log('Trying to go to success.html');9 });10 promise.catch(e => {11 console.log(e.code, ' ',e.message)12 });13});Once user is signed in or registered, below code will get notified about the change in authorization and run accordingly which is to get the user details, its interesting when the user is a federated one like google(only i had tried so far), it shows user profile pic.
1/* When AUTH state changs execute this2 ––––––––––––––––––––––––––––––––––––––––––––––––––------------------------------------ */ 3 firebase.auth().onAuthStateChanged(firebaseUser => { 4 5 if(firebaseUser){ 6 tdUID.innerText = firebaseUser.uid;7 console.log(firebaseUser.providerData);8 if(firebaseUser.providerData.length>0){9 tdProvider.innerText = firebaseUser.providerData[0].providerId;10 tdName.innerText = firebaseUser.displayName;11 tdEmail.innerText = firebaseUser.email;12 imgURL.src = firebaseUser.photoURL;13 imgURL.width = 150;14 imgURL.height = 150;15 16 tdEv.innerText = firebaseUser.emailVerified;17 tdCt.innerText = firebaseUser.metadata.creationTime;18 tdLlt.innerText = firebaseUser.metadata.lastSignInTime;19
20 txtVEA.innerHTML = firebaseUser.email + '(' + firebaseUser.emailVerified + ')';21 }22 }else{23 tdUID.innerText = "-";24 tdProvider.innerText = "-";25 tdName.innerText = "-";26 tdEmail.innerText = "-";27 imgURL.src = "";28 imgURL.width = 0;29 imgURL.height = 0;30 tdEv.innerText = "-";31 tdCt.innerText = "-";32 tdLlt.innerText = "-";33 }34 });Below is for the signout
1/* Signout2––––––––––––––––––––––––––––––––––––––––––––––––––------------------------------------ */3btnSO.addEventListener('click', e => {4 const auth = firebase.auth();5 // console.log('Current user : ',firebase.User);6 // console.log('BEfore Signout - ', auth);7 auth.signOut();8 // console.log('After Signout - ', auth);9 // console.log('Current user : ',firebase.User);10});Code above is pretty much straight forward, not much of explanations are required, i thought and firebase documentation on this also pretty neat.
# Firebase operations
Firebase data is node-based meaning its like a JSON key:value structure in a deep nested way. When planning the structure of the data on the side one needs to also think about security. Data structure totally depends on how the application UI looks or interacts. Here rules of relational database does not apply. So, think structuring the database like that. Being a Db2 DBA, that was bit of a learning curve for me, when working with firebase. Here, its all about denormalization and maintaining data integrity. Its all about multiple batched updates or creating a cloud function to update asynchronously(fun stuff).
Data synchronization is the heart of firebase, once you connect your realtime application to firebase, it starts listening for changes in the database and once the change is made, it pulls the changes even if you are not asking for it. There is no need to query and get the data, thats the special thing about firebase. Firebase doesn't use HTTP, it uses WebSocket, it is much faster than HTTP(they say).
Technically to say,
Data stored in a Firebase Realtime Database is retrieved by attaching an asynchronous listener to a database reference. The listener is triggered once for the initial state of the data and again anytime the data changes.
I can think of only one negative point about firebase being a database, there is no query language like SQL to fetch or do any data manipulation, but thats OK.
Changes to data are refered to as events. Here we will be explore one-by-one.
- VALUE event : It is triggered once with the initial data and again every time the data changes, it will return all the data not just changed or new one.
1//Create referencecs2const dbRefObject = firebase.database().ref().child('chat-test');3
4// Sync object changes - .on(value)5dbRefObject.on('value', snap => {6 let allData = snap.val();7 // console.log(allData);8 let keys = Object.keys(allData)9 // console.log(keys);10 for(k in keys){11 k = keys[k];12 let data = allData[k]; 13 let msgClone = makeMessage2(k, data['time'], data['username'], data['message']);14 msgBox1.insertBefore(msgClone, anchor1);15 }16});- VALUE event with ONCE method : Retreives data once in the beginning or whenever page is refreshed
1dbRefObject.once('value', snap => {2 let allData = snap.val();3 // console.log(allData);4 let keys = Object.keys(allData)5 // console.log(keys);6 for(k in keys){7 k = keys[k];8 let data = allData[k]; 9 let msgClone = makeMessage2(k, data['time'], data['username'], data['message']);10 msgBox2.insertBefore(msgClone, anchor2);11 }12});- Child event - child_added : Retreives data whenever a new child is added to the node its listening to.
1dbRefObject.on('child_added', (snap, prevChildKey) => {2 let data = snap.val();3 let key = snap.key; //child_added doesn't give key by default4 // console.log(data);5 console.log('child_added : key=' + key + ', prevChildKey=' + prevChildKey);6 let msgClone = makeMessage2(key, data['time'], data['username'], data['message']);7 msgBox3.insertBefore(msgClone, anchor3);8});- Child event - child_changed : Retreives child node whenever it is updated
1dbRefObject.on('child_changed', (snap, prevChildKey) => {2 let data = snap.val();3 let key = snap.key; //child_added doesn't give key by default4 console.log(data);5 console.log('child_changed : key=' + key + ', prevChildKey=' + prevChildKey);6 let msgClone = makeMessage2(key, data['time'], data['username'], data['message']);7 msgBox4.insertBefore(msgClone, anchor4);8});- Child event - child_removed : Retreives data whenever a child node is deleted
1dbRefObject.on('child_removed', (snap) => {2 let data = snap.val();3 let key = snap.key; //child_added doesn't give key by default4 console.log(data);5 console.log('child_removed : key=' + key);6 let msgClone = makeMessage2(key, data['time'], data['username'], data['message']);7 msgBox5.insertBefore(msgClone, anchor5);8});- Child event - child_moved : Retreives data whenever the order of data is changed. ie., when someone moves from rank 5 to rank 4. Here in the example, when the datetime is changes, the order is changed.
1dbRefObject.orderByChild("time").on('child_moved', (snap) => {2 let data = snap.val();3 let key = snap.key; //child_added doesn't give key by default4 console.log(data);5 console.log('child_removed : key=' + key);6 let msgClone = makeMessage2(key, data['time'], data['username'], data['message']);7 msgBox6.insertBefore(msgClone, anchor6);8});- Update : Using this function, i insert/add data to the firebase database. Here,
- Line(2) - Generates a pushkey, its sort of a unqiue key.
- Line(5) - Update node path where i want to add the key. If the key doesn't exist, it adds and if it exists, it updates. Multiple data can be batched into
updatesvariable and executed in Line(6)
1function addMessage(time, username, message){2 var key = dbRefObject.push().key;3 var temp = {time, username, message};4 var updates = {};5 updates['/chat-test/' + key] = temp;6 firebase.database().ref().update(updates);7}- Delete using update : Deleting a node is just nullifying it like below.
1updates['/chat-test/' + key] = null;2 firebase.database().ref().update(updates);If it goes, it goes, no way to retreive deleted data back.